Preview Three Rebel Starship Expansion Packs for STAR WARS (TM): Armada![]()
“I just said you were a fair pilot. I didn’t know they were lookin’ for somebody to lead this crazy attack.”
–Han Solo
Our last preview of Star Wars™: Armada focused on the Victory-class Star Destroyer and the Gladiator-class Star Destroyer, the two Imperial starships coming out in the game’s first wave of expansions. Today, we continue our exploration of the game, its ships, and its expansions with a look at the three different capital ships with which the Rebellion will soon be able to confront these Star Destroyers.
CR90 Corellian Corvette Expansion Pack
![]()
The miniature CR90 Corellian corvette found in the CR90 Corellian Corvette Expansion Pack is identical to that found in the game’s Core Set. Still, the expansion is well worth the consideration of anyone looking to field more than one corvette in battle.
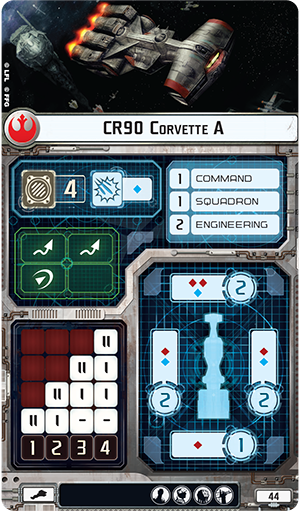
First of all, most ambitious Rebel commanders are likely to want their fleets to count a good number of corvettes. Certainly, it’s possible to bring more than one to battle. The CR90 Corvette A weighs in at just forty-four of your three-hundred fleet points, and the CR90 Corvette B costs you a mere thirty-nine fleet points. For those points, though, both ships offer you three-dice attacks from your primary, forward-facing weapons; four hull; and a total of seven shields.
![]()
![]()
The ship cards for the CR90 Corvette A (left) and CR90 Corvette B (right).
However, the expansion’s benefits extend far beyond the additional miniature you’ll find within it. As with the Imperial starship expansions, each Rebel starship expansion pack introduces a number of upgrade cards, several of which are unique to the expansion.
For example, the CR90 Corellian Corvette Expansion Pack allows you to recruit Mon Mothma as your commander should you prefer her to the Core Set’s General Dodonna. It also comes with the valiant Raymus Antilles and two different titles, meaning that you can fly the iconic Tantive IV or daring Jaina’s Light alongside the Core Set’s Dodonna’s Pride.
![]() As the lightest and most agile ship within the Rebel fleet, the CR90 corvette offers a great deal of tactical flexibility not available to your other ships, and the expansion capitalizes upon this flexibility. Not only does the expansion’s Raymus Antilles allow your corvette to double up on the effects of any command it chooses, gaining a token even as it executes the command from the dial, but a number of other cards allow you to exploit the different upgrades available to the CR90 Corvette A and CR90 Corvette B.
As the lightest and most agile ship within the Rebel fleet, the CR90 corvette offers a great deal of tactical flexibility not available to your other ships, and the expansion capitalizes upon this flexibility. Not only does the expansion’s Raymus Antilles allow your corvette to double up on the effects of any command it chooses, gaining a token even as it executes the command from the dial, but a number of other cards allow you to exploit the different upgrades available to the CR90 Corvette A and CR90 Corvette B.
Where the CR90 Corvette B features an ion cannons upgrade, the CR90 Corvette A instead features the turbolaser upgrade. Accordingly, you might add the Leading Shots upgrade card to a CR90 Corvette B equipped with the Dodonna’s Pride in order to deal faceup damage cards directly to the hulls of enemy ships, especially in a fleet with General Dodonna as commander. Or you might equip your CR90 Corvette A with the H9 Turbolasers upgrade, and if your opponent’s Victory-class Star Destroyer has spent one of its redirect tokens, you can convert one of your damage results to an accuracy result in order to force your opponent to soak the damage you deal on the hull zone you’ve targeted.
The way Armada allows you to upgrade and customize your ships ensures that you’ll have tremendous control over the way they fit into your overall strategy, and the CR90 Corellian Corvette Expansion Pack greatly increases the number of roles your corvettes can play within your Rebel fleet.
Nebulon-B Frigate Expansion Pack
![]()
The second Rebel ship found in the Core Set is the Nebulon-B frigate, and the Nebulon-B Frigate Expansion Pack enhances its utility and versatility within your fleet by adding a pre-painted Nebulon-B miniature along with eight upgrade cards.
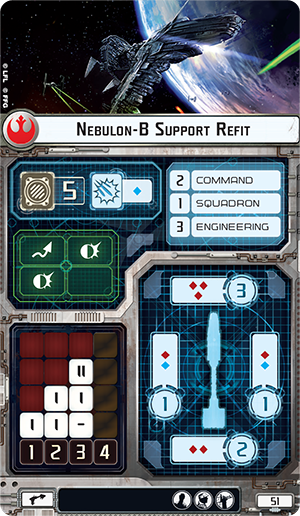
The Nebulon-B is a ship that is truly designed to play one of two different roles within your fleet, and the Nebulon-B Frigate Expansion Pack further highlights the distinctions between the roles, allowing you to use it as a powerful support ship or as a potent fighter escort. Of course, once you have both the Core Set and the Nebulon-B Frigate Expansion Pack, you can field two Nebulon-B frigates in battle, potentially utilizing both the Nebulon-B Escort Frigate and the Nebulon-B Support Refit in the same fleet.
![]()
![]()
The ship cards for the Nebulon-B Escort Frigate (left) and Nebulon-B Support Refit (right).
Both these types of Nebulon-B frigate feature the same attack dice, shields, hull, and upgrade slots. There are two key differences that merit the six extra fleet points. First of all, the Nebulon-B Escort Frigate gains an extra blue die to its anti-squadron armament, making it far more effective at eliminating enemy squadrons, either to protect itself or free up your fighters to attack enemy ships. Additionally, it gains an extra squadron value, meaning it can activate an extra squadron whenever it reveals the squadron command. This is particularly meaningful if you equip your Nebulon-B frigate with the expansion’s Yavaris title, which allows your squadrons to attack twice when you activate them with the squadron command, so long as they don’t move. Add Luke Skywalker to the mix, and the differences between the two types of Nebulon-B designs becomes profoundly noticeable.
Of course, there’s plenty to say in favor of the Nebulon-B Support Refit. For starters, it comes with all the same attack dice, but at a discount of six fleet points. This is a great option for fleet admirals who plan to use their Nebulon-B frigates to attack directly. For starters, the Salvation title adds extra damage with each ![]() result it scores from its front hull zone. Then, the addition of an Intel Officer or XI7 Turbolasers (or both) can minimize your opponent’s ability to defend against your attacks, ensuring that they hit for maximum, targeted impact.
result it scores from its front hull zone. Then, the addition of an Intel Officer or XI7 Turbolasers (or both) can minimize your opponent’s ability to defend against your attacks, ensuring that they hit for maximum, targeted impact.
![]()
![]()
The Support Refit is also, arguably, the better ship to outfit with the Core Set’s Redemption title, which is the title you’d likely select if you wanted your Nebulon-B to play a more defensive role than offensive one. It grants an extra point of engineering to friendly ships within Range 1–5 whenever they resolve the repair command, either from the dial or from a token. Either way, that extra point may make the difference between merely moving a shield and recovering one, or between recovering a shield and discarding some harmful faceup damage card. Additionally, that extra point of engineering piles up quickly; the more you resolve the repair command, the more value you get from the Redemption.
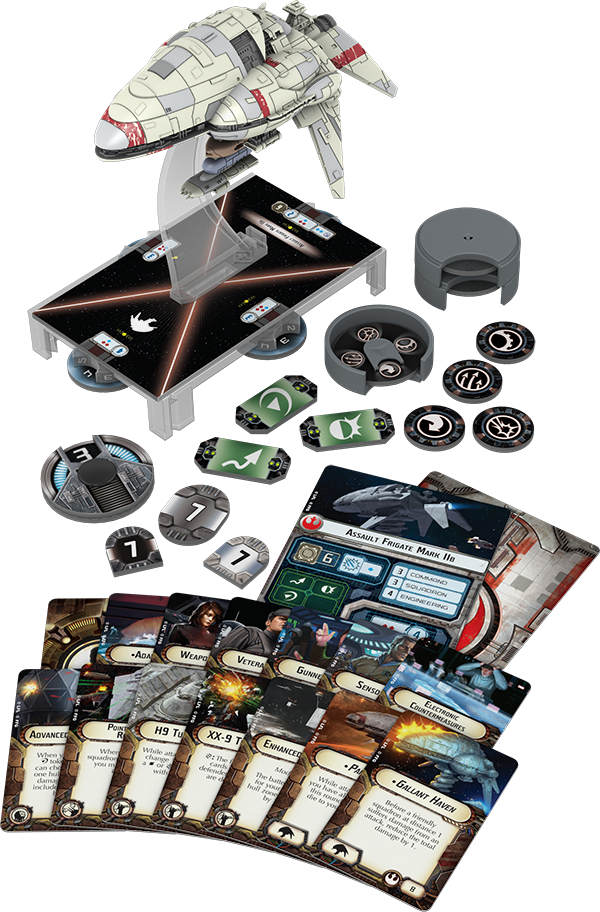
Assault Frigate Mark II Expansion Pack
![]()
The third of the Rebel starship expansion packs in the first wave of Armada releases is the Assault Frigate Mark II Expansion Pack.
Featuring one pre-painted Assault Frigate Mark II miniature and fourteen upgrades, this is the big Rebel expansion for admirals who want to battle the Empire’s Star Destroyers on more even terms. While neither the CR90 corvette or Nebulon-B frigate wield firepower that measures up to a Star Destroyer’s, and both demand that you fly them carefully about the battlefield in order to limit their exposure to your opponent’s main weapons, the Assault Frigate Mark II can fire attacks of four dice from either its left or right hull zone.
Those are attack values that match the Gladiator-class Star Destroyer’s best attacks for total dice, but at a greater distance, and while they don’t quite measure up to the Victory-class Star Destroyer’s forward attack, they give the advantage to any Rebel commander who can maneuver an Assault Frigate Mark II alongside a Victory-class Star Destroyer, whose left and right hull zones attack for only three dice each.
As to be expected, as with each of the other ships, there are multiple ways to outfit your Assault Frigate Mark II, and you will find notable differences between the eighty-one fleet point Assault Frigate Mark II A and the seventy-two fleet point Assault Frigate Mark II B.
![]()
![]()
The ship cards for the Assault Frigate Mark II A (left) and the Assault Frigate Mark II B (right).
For the extra fleet points it costs you, the Assault Frigate Mark II A gains an extra blue attack die from its forward and rear hull zones. It also features a more impressive anti-squadron armament of two blue dice, instead of just one. On the other hand, the Assault Frigate Mark II B features a squadron value of “3” instead of “2.” It may not be as well-equipped at dealing with enemy fighters directly, but it can better coordinate any fighter wing sent to escort it.
However, both versions of the Assault Frigate Mark II feature a command value of “3,” meaning that it’s noticeably less responsive than the Rebellion’s other ships. As is true of all the starships in Armada, the more powerful ships demand that you plan further ahead.
Still, the ship’s larger command value also means that it can hold more command tokens for later use, and that pairs well with the ability of the expansion’s commander, Garm Bel Iblis, who in both the game’s first and penultimate rounds allows you to add a number of command tokens to each of your ships equal to their command ratings.
![]()
![]()
Garm Bel Iblis is accompanied within the expansion’s upgrades by another unique Rebel, Adar Tallon, who serves equally well aboard the Assault Frigate Mark II B and the Yavaris. For ten fleet points, Adar Tallon basically allows you to get double the value out of your best squadron pilot every round, and if you choose to go all-in on the investment in your squadrons, you may also wish to consider equipping your Assault Frigate Mark II B with the Gallant Haven title, which reduces by one the total damage dealt to any of your squadrons at distance “1.”
Like the Nebulon-B frigate, the Assault Frigate Mark II also seems to be meant for one of two roles, and if you opt not to outfit it as a fighter escort, then you can add the Paragon title to add one black die to any attack your ship makes as a second attack against the same target. With the Paragon title, your Assault Frigate Mark II A can concentrate its fire upon a single foe for as many as eight attack dice, or nine if you also outfit it with the Enhanced Armament upgrade.
Even Star Destroyers have a hard time concentrating nine dice at the same foe, and if you start launching those sorts of explosive attacks against your enemies, it’s worth taking a look at adding the Sensor Team upgrade to your ship. At the cost of two dice, the Sensor Team allows you to gain an accuracy result when you need it to prevent your opponent from halving the damage his ship would otherwise take.
The Fleet Will Be Ready Soon
The Rebel fleet is gathering outside of Sullust and will soon be ready for action. How will you meet the Imperials? Will you swarm them with your corvettes? Will you use the Yavaris, Gallant Haven, and Adar Tallon to get the most out of your ace fighter pilots? Or will you bring out the big guns of your Assault Frigate Mark II A?
In our next preview, we’ll take a look at the fighters and pilots in the Rebel and Imperial Fighter Squadron Expansion Packs. Until then, head to our community forums to share your favorite Rebel fleet designs with the other members of the Armada community!
...


 Some of the most unlikely players in the game of thrones are the clansmen of the Vale. For years, they were content to raid travelers and passerby without involving themselves in larger affairs. But the arrival of Tyrion Lannister changed that forever, and Clansman characters can form a crucial part of the Lannister forces in A Game of Thrones: The Card Game. With the arrival of A Deadly Game, you’ll find more Clansman to lead across Westeros.
 Your Clansman characters gain another boon in the Moon Brother Harriers (A Deadly Game, 27), warriors belonging to Ulf’s clan. This character bears a War crest, making it a useful for using cards like Die by the Sword (Lords of Winter, 47), and what’s more, the Moon Brother Harriers have the opportunity to enhance your other Clansman characters. By paying one gold during a challenge, you can give your participating Clansman characters one additional STR until the end of the challenge. What’s more, you can activate this ability once per challenge, and the Moon Brother Harriers don’t even need to participate in the challenge to trigger their ability. When enough of the Valemen unite, the Moon Brother Harriers and the Lannisters’ coin can sway any challenge in your favor.


 result it scores from its front hull zone. Then, the addition of an


 A critical part of that victory condition is destroying your opponent’s units. As my epiphany revealed, the harder a unit is to destroy, the harder it is for you to gain points by killing it. The more points your opponent has invested in hard-to-destroy units, the harder it is for you to gain those points. I looked down at
 3. Given the answers to points 1 and 2, which of my opponent’s models do I need to destroy to get to forty points?


_FightingMutants.png)
 The amount of player involvement in an Inquest means that Acolytes have the discretion to choose their target, the scope of their objective, and the resources they will use to accomplish it. This ensures that players and GMs are on the same page at the outset of the adventure and it further represents the discretion that trusted Acolytes and even Inquisitors exercise in deciding which threats to pursue and how best to prosecute their duties.